

Make your public status page match your brand — your colours, your spacing and the sections you want visitors to see — all without needing a designer. This is for anyone who manages a status page and wants it to look right before it goes live.
#Overview
- Every look-and-feel option lives in one place, with a live preview beside it so you can see the effect before you save.
- You control the layout, colour scheme, header, header image, spacing, how much history shows, and which sections appear.
- A few things are fixed on purpose — like outage colours and section order — so visitors always recognise trouble at a glance.
#Open the Appearance settings
- Go to Status pages.
- Open the page you want to change.
- Press Settings at the top.
- Pick Appearance from the list on the left.
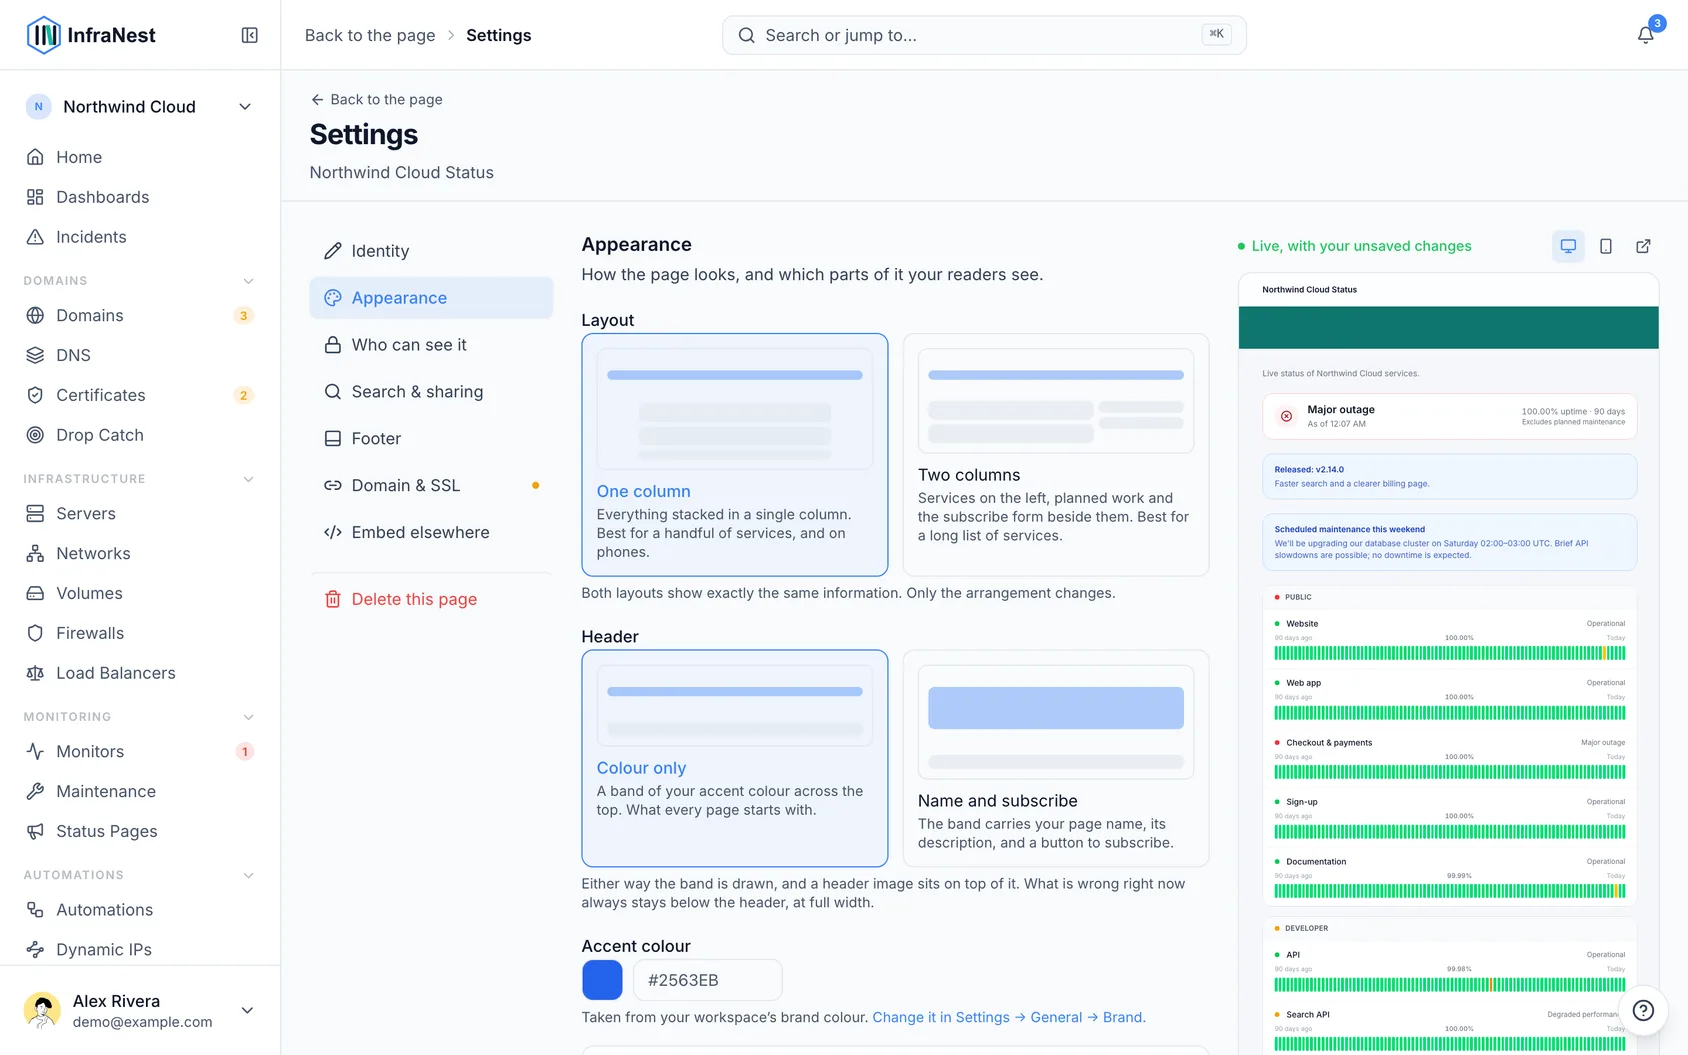
Beside the settings you'll see your page, and it updates as you change things — before you save. It shows the top of your page with your real services in it, not a stand-in. Appearance is the only place with the whole page beside it, because it's the only place where seeing the page is how you decide.
#Choose a layout
- Under Layout, pick One column or Two columns — each shows a small drawing of itself so you can see the difference first.
- One column puts everything top to bottom. It's the right choice for most pages, and it's the default.
- Two columns puts your services on the left, with planned maintenance and the subscribe form in a narrower column beside them. Switch to this when you list a lot of services and the single column has become a long scroll.
Both layouts show exactly the same information — nothing is added, hidden or reworded, only moved. Whatever's currently wrong always stays full width at the top, never in the side column. On a phone, a two-column page folds back into one, so nothing is lost.
#Set the colour scheme
- Under Colour scheme, pick Light, Dark, or Auto.
- Auto follows each visitor's own device, and keeps following it if their device switches later while the page is open.
- Choose Light or Dark instead if your page should always look the same to everyone.
#Choose a header style
- Under Header, pick Colour only or Name and subscribe.
- Colour only is a band of your accent colour — the starting look for every page.
- Name and subscribe puts your page name and description in the band, with a button that takes visitors straight to the subscribe form. Turn this on if people arrive wanting to be told when things change.
- If you chose Name and subscribe, you can also turn the header's fade off for a flat band instead of a gradient.
Either way, anything that's currently wrong stays below the band, full width — a header never reports the outage.
#Set a page colour
- Under Colour, click the swatch to pick a colour, or type a hex code into the box.
- Leave it empty to use your workspace's brand colour — the box links to where that's set, at Settings → General → Brand.
- Set a colour here instead when this page belongs to a different brand — a second product, or a customer you publish on behalf of.
NoteA workspace-wide brand colour — shared by all your pages and your emails — is part of white-label branding. Without it, a page you leave empty uses the InfraNest colour, and the box says so.
#Add a header image
- Under Header image, click to upload or drag and drop a PNG, JPG, WebP or SVG up to 5 MB.
- Very large images are refused, because every visitor's browser has to load it, and a status page is exactly the page everyone opens at once.
If you don't add one, nothing looks unfinished — the page simply starts with your logo and name, as it does today.
#Adjust spacing
- Under Spacing, choose Roomy or Compact.
- Roomy is the normal look. Compact tightens the rows so more services fit on screen at once.
Compact only changes spacing — it never hides a service or removes a section.
#Choose how much history shows
- Under History shown, choose 30, 60, or 90 days.
- This sets how far back the uptime bars beside each service go, and how far back the incident history reaches.
A shorter range also makes the page a little faster, because there's less to work out.
#Turn sections on or off
- Under Sections, turn off anything your page doesn't need:
- Uptime bars beside each service
- Planned maintenance
- Third-party services you watch
- Incident history
- Group headings above each set of services
- Tags on a service
- Visitors never see an empty section — anything switched off is simply not there.
TipLooking for the overall uptime strip or email subscriptions switches? They've moved. The uptime strip only ever showed on the embeddable badge, so it's now in Settings → Embed elsewhere. Email subscriptions decides who hears from you rather than how the page looks, so it's on the Subscribers tab — turning it off also removes the subscribe box from your page.
#Decide whether maintenance counts against your uptime figure
- By default, downtime during a maintenance window doesn't lower your page's uptime figure, and your page shows Excludes planned maintenance next to the figure to explain why.
- To count planned maintenance in the figure instead, turn off Leave planned maintenance out of the uptime figure, just under Show uptime percentage.
- The note next to the figure disappears once you do.
#What visitors always see
Some things aren't configurable, on purpose:
- Status colours. A major outage is red on every page, whatever your accent colour is — so trouble is recognisable at a glance, even to a first-time visitor.
- The order of sections. What's wrong now comes before what's planned, which comes before what's already fixed. Changing the layout moves sections around the page, but never past that line.
#Does this apply everywhere?
Yes. These settings apply to your page on our domain, on your own custom domain, and to the copy served from our edge network during an outage — that last one is what people see when the rest of our system is unreachable, so it's the version that matters most.
Was this article helpful?
Thanks for your feedback!
Thanks, this goes straight to the docs team.