

Firewalls and bot protection are built to let a browser through and turn away an automated visitor — and our checks are automated visitors. When that happens, the check never reaches your site, so it measures nothing. This article is for anyone whose monitor can't seem to reach a site that's actually working fine, and shows how to tell what's happening and how to let InfraNest's checks through.
#Overview
- Firewalls, bot protection and services like Cloudflare, AWS WAF, Akamai, Vercel, Imperva, Sucuri, DataDome and Imunify360 can mistake our checks for unwanted bots and block them.
- A blocked check is not counted as downtime and sends no alert — your site is probably fine for real visitors.
- Until our probes are let through, though, the monitor can't tell you when the site actually goes down.
- A block page you wrote yourself looks like any other error to us (for example "HTTP 403 (expected 200)") — the steps here fix that too.
#How you can tell
- On the monitor's page, look for a panel that says something like "Cloudflare turns our checks away" (or the name of whichever service is blocking us). It lists our addresses and a rule ready to paste.
- Check the result text on a failed check — it may read "Cloudflare's bot protection turned our check away".
- If it keeps happening — three checks in a row from every location, or one location for an hour — Home will list "We can't check …" once, and the notification bell will show it too.
#Before you start: get our addresses
- Open the monitor's page. The panel there lists our probe addresses and the exact rule for your service — select Copy next to it.
- Or get the full list from https://api.infranest.io/api/probes.txt (one address per line) or https://api.infranest.io/api/probes.json. If your firewall can fetch a list automatically, have it re-read this every hour or so — the addresses change rarely.
- https://developers.infranest.io/probes explains what our probes do, which is handy to send to whoever manages your firewall.
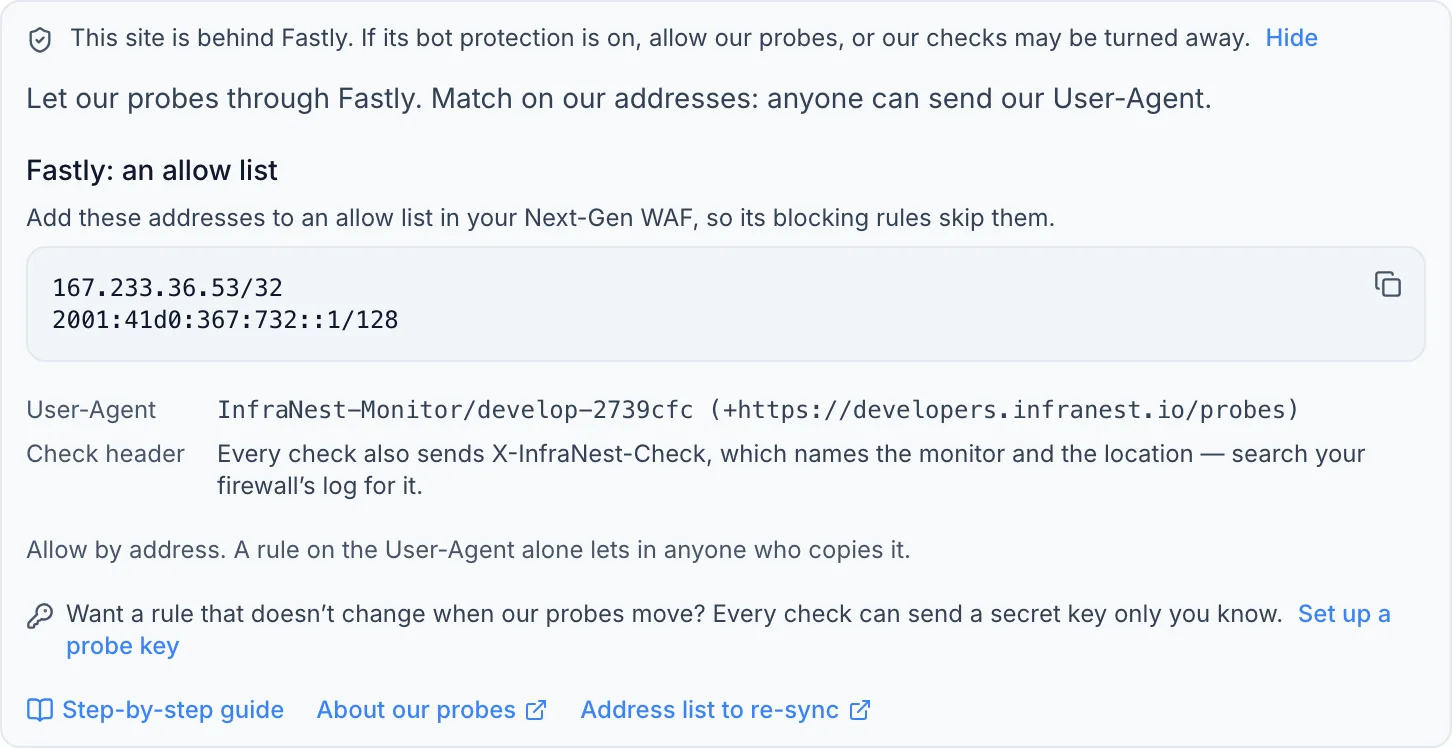
NoteEvery check also sends a User-Agent starting with
InfraNest-Monitor/…and a header,X-InfraNest-Check, naming the monitor and location — useful for finding blocked requests in your firewall's log. But anyone can copy a User-Agent, so don't rely on it alone. Every check is also cryptographically signed (the Web Bot Auth standard) with keys published at https://api.infranest.io/.well-known/http-message-signatures-directory, so a service that checks signatures can tell our checks apart from an impersonator.
Cloudflare already knows us. Cloudflare lists our checks as a verified bot. On the Pro, Business or Enterprise plan, Super Bot Fight Mode lets verified bots through when Verified bots is set to Allow under Security → Bots — so you may need no rule at all. On the Free plan, Bot Fight Mode has no such setting, and your own custom rules, IP Access rules and rate limits still apply to us like anyone else.
#Allow Cloudflare in one click
If the site's DNS zone is in a Cloudflare account you've connected under Integrations, InfraNest can add and maintain the rules for you.
- On the monitor's page, find the panel Allow our probes in Cloudflare, in one click and select Allow in Cloudflare. (Home offers the same button next to "We can't check …".)
- Review the dialog — it lists exactly what will be created in that zone:
- An IP Access rule with the action Allow for each of our addresses.
- On the Pro, Business or Enterprise plan, a custom rule that lets our addresses skip Super Bot Fight Mode, Security Level and Browser Integrity Check (added after your own rules, so a rule of yours that blocks still wins).
- Select Create these rules. We check the site again straight away — when a check gets through, the panel and the Home item disappear.
TipOn the Free plan, no rule can skip Bot Fight Mode, but Bot Fight Mode leaves alone a request an IP Access rule allows — which is exactly what Allow in Cloudflare adds. If checks are still turned away, turn Bot Fight Mode off under Security → Bots, or move the zone to Pro.
When our probes move, we update the rules within the hour automatically. To remove them, select Remove our rules in the same place — we only ever touch the rules we created.
If it says the integration needs reconnecting, select Reconnect Cloudflare (or Open the integration), sign in again or replace the key, and the button returns. Until then, use Cloudflare by hand below.
If it says the integration needs a permission, select Open Cloudflare's token page, add Zone → Firewall Services → Edit (and, on Pro and up, Zone → Zone WAF → Edit) to the token, then select Try again.
#Allow by a secret header
A secret header never goes stale, even when our probe addresses change. Every check can send X-InfraNest-Probe-Key with a key only you know — a firewall rule on that key lets our checks through no matter where they come from, and unlike our User-Agent, nobody else can copy it.
- In Monitoring, open the ⋯ menu and select Probe key (owners and admins only).
- Select Create a probe key. From the next check on, every monitor in the workspace sends it.
- Copy the ready-made rule for your firewall from the same page — there are rules for Cloudflare, AWS WAF, nginx, Apache and ModSecurity (used by Imunify360 and most hosting panels).
WarningWe send the key only to the site the monitor checks — never along a redirect to another site. Treat it like a password: if it leaks, select Renew the key and update your firewall rule right away, because the old key stops working immediately. Switch off stops us sending it at all.
#Allow us in Cloudflare by hand
Pro plan and up — a custom rule that skips:
- In Cloudflare, go to Security → WAF → Custom rules and select Create rule.
- Select Edit expression and paste the expression from the monitor's page (it looks like
(ip.src in {203.0.113.10 2001:db8::10})). - Choose the action Skip, and tick All remaining custom rules, All rate limiting rules, All managed rules and All Super Bot Fight Mode rules.
- Place the rule first, and deploy it.
Free plan — Bot Fight Mode: no custom rule can skip it, but it leaves alone a request an IP Access rule allows.
- Go to Security → WAF → Tools → IP Access Rules.
- Add each of our addresses with the action Allow. Or turn Bot Fight Mode off under Security → Bots.
#Allow us in AWS WAF (CloudFront, a load balancer, API Gateway)
- In AWS WAF, go to IP sets and create one with our IPv4 addresses (and a separate one for IPv6), each written as
203.0.113.10/32. - In your web ACL, add a rule: if the request comes from the IP set, Allow. Give it a lower priority number than Bot Control and any blocking rule, so it's evaluated first.
#Allow us in Akamai
- Create a network list containing our addresses.
- Add it to the bypass list of your App & API Protector or Bot Manager policy.
- Activate the configuration.
#Allow us in Fastly
- In the Next-Gen WAF, add our addresses to an allow list.
- Make sure the list is used by a rule with the action Allow, so blocking rules skip it.
#Allow us in Vercel
- In your project, go to Firewall → Configure.
- Add a new rule: if IP Address is one of our addresses, then Bypass.
- Save and publish it.
#Allow us in Imperva
- Under Website → Security, add our addresses as an exception to the bot protection and WAF rules that block them.
#Allow us in Sucuri
- In the Sucuri dashboard, go to Firewall → Access control → Whitelist IP addresses.
- Add each of our addresses.
#Allow us in DataDome
- In the DataDome dashboard, add a custom rule that matches our addresses.
- Set the response to Allow.
#Allow us in cPanel and Imunify360
- In Imunify360, go to Firewall → White list and add our addresses.
- On the command line, as root, add addresses one at a time:
imunify360-agent ip-list local add --purpose white 203.0.113.10 --comment "InfraNest monitoring"
- On shared hosting, ask your hosting company to whitelist the addresses for you.
#Allow us in fail2ban
- Add our addresses to
ignoreipin the[DEFAULT]section of/etc/fail2ban/jail.local:
ignoreip = 127.0.0.1/8 ::1 203.0.113.10 2001:db8::10
- Reload fail2ban for the change to take effect.
#Allow us in nginx
- If you only allow some addresses (
allow …; deny all;), add anallowline for each of ours beforedeny all;. - If a rate limit (
limit_req) is turning our checks away, exempt our addresses from it using ageoblock.
#After you've allowed us
- Go back to the monitor's page.
- Select Run now (via the ⋯ menu, or the Test connection control shown there).
- When the check gets through, the panel goes away, and so does the item on Home.
#Troubleshooting
- The edge network itself can't reach your server. Sometimes the service in front of your site answers with its own error, such as "Cloudflare couldn't reach the site's own server (521)", "…got no answer in time from the site's own server (522)" or "…couldn't make a secure connection to the site's own server (526)". That's a real outage — visitors see the same error, so it counts as downtime and alerts you. Check that your server is running, that its firewall lets the edge network's addresses in, and that its certificate is valid.
Was this article helpful?
Thanks for your feedback!
Thanks, this goes straight to the docs team.
Related articles
 CloudflareConnect CloudflareConnect Cloudflare to manage your DNS, domains and SSL certificates from InfraNest. Your Cloudflare zones and records appear automatically once it's connected.Monitors & checksAbout monitoringMonitoring watches your websites, APIs, servers, DNS and certificates from several regions, confirms real outages before it alerts you, tracks incidents, and…Monitors & checksAdd a monitorPaste what you want to watch — an address, a server's IP, a host with a port or the name of a service — and InfraNest suggests the monitors worth having.Monitors & checksShow monitoring on a team screenTeams that watch their sites together often put a dashboard on a TV. Display on a screen turns monitoring into a page made for that: big text you can read…